How to Set Up Your Honeywell Alarm with Apple Home for Push Notifications and Geofence-Based Arming/Disarming
I’ve lived in my house for nearly 20 years and have automated many things. However, one of the last holdouts was my Honeywell Ademco Vista 20p alarm system. I was initially hesitant to modify such an outdated system, but I finally decided to take the plunge. My goal was to enable remote arming and disarming, receive push notifications, use the sensors in automations, and integrate the alarm with HomeKit to automate arming and disarming based on presence—for example, arming when the last person leaves and disarming when the first person arrives.
To achieve this, I purchased the Eyezon Duo. After it arrived, I followed the initial software activation instructions to register the device to my account.
Next came the installation, which involved wiring the Duo to my alarm system and running an Ethernet cable through my attic, as the device doesn’t support Wi-Fi and requires a wired internet connection.
To create a custom-length cable, I bought a spool of Cat6e cable from Best Buy Insignia. They sell an entire spool, measure what you take, and allow you to use what you need. You return the remainder for a refund, and it costs approximately $0.30 per foot.
I was motivated to get the wiring done while I had some solar installers on-site so that I could borrow their Ethernet crimper, cable tester and ladder to access my attic. Thanks, Jesse!
Retrieving the Honeywell Installer Code
After installing the Eyezon Duo, I needed to add it as a virtual keypad/panel to my Honeywell alarm system. To do this, the first step was retrieving the installer code for my alarm. Once I had the installer code, I was able to move forward with the setup. Make sure to save this code since you may need it again in the future. I attempted to get this code from the folks who manage my alarm but it was against their policy since they don’t want folks messing up their systems.
Don't Know Your Installer Code?

Step 1: Shut down the system.
1. Shut down transformer.
2. Shut down battery.
3. Leave system off for 60 seconds.

Step 2: Bring the system back up.
1. Repower the battery.
2. Repower the transformer.

Step 3: Force system to programming mode and retrieve existing installer code.
1. Within 30 seconds of rebooting system, push and hold the * and # keys together on a keypad.
2. Hold for 2 seconds and the 20 should appear on the display which indicated you are in programming mode. If 20 does not appear the panel is locked and you must contact the installer for the code.
3. Enter #20 and the display will show the existing installed for digit code, one digit at a time.
I ran into the following challenges with the Eyezon Duo instructions.
Finding the Wire to Connect the Duo to the Alarm Panel
The first challenge was figuring out how to wire the Duo to my alarm system. The instructions mentioned that the necessary cable wasn’t included. However, when I thoroughly unpacked the box, I unexpectedly found a short cable tucked away in the packaging.
Logging into the Duo Device on the Local Network
The second challenge was figuring out how to connect to the Eyezon Duo device on my local network. I stumbled on some instructions online that mentioned the default username is “user,” and the password is the last six digits of the device’s MAC address (which can be found on a sticker on the bottom of the device). It’s a good idea to snap a photo and jot down these details for reference.
Adding the Duo as a Keyboard to the Honeywell Panel
Next, I encountered a challenge adding the Duo as a keypad, as the default address 18 was already in use by my Honeywell panel. To resolve this, I logged into the Eyezon Duo device portal and registered the Duo to a different keypad address—in my case, address 21 was available.

To complete adding the Duo as a keypad I needed to enter the following codes on my Honeywell panel:
(Installer Code) 800 *194 10 *99Programming the Duo to Work with the Honeywell Alarm
Once the Duo was configured as a keypad, I programmed the Honeywell Vista Panel following the 23-step process outlined on pages 9 and 10 of the manual. Initially, I was unsure if every step was necessary—but yes, they all are.
Honeywell Vista 10P, 15P, 20P & 21iP

1. Enter (Installer Code) + 800 to access installer programming mode. “20” should appear on the display. If you
do not know the Installer Code, see Troubleshooting Tips on page 13.

2. Keypad programming: *190 to *196 (addresses 17-23) are the keypad programming sections. Enable the assigned Envisalink4 addresses as needed. If it is a single partition system using the default Envisalink4 address of 18, the programming section is *191. In section *191 enter 10. If the keypad was on Partition 2, you would enter 20.

3. *29 Enable IP/GSM (IP/GSM/LRR support required for your Envisalink4 to transmit alerts): The codes to enter in the section depend on the age of the panel. Start by entering 1, If you hear 3 beeps proceed to #4; if not continue with *0**.

4. *48 Report Format: Enter 77 (this is pre-set and cannot be changed on ADT Panels).

5. *49 Split/Dual Reporting: Enter 5 and you will hear 3 beeps.

6. *50 Burglary Dialer Delay: Enter 0 and you will hear 3 beeps.

7. *54 Dynamic Signalling Delay: Set to 0 and you will hear 3 beeps.

8. *55 Dynamic Signalling Priority: Set to 1 and you will hear 3 beeps.

9. *59 Exit Error Alarm Report Code: Set to 0 and you will hear 3 beeps.

10. *60 Trouble Report Code: Enter 10 and you will hear 3 beeps.

11. *62 AC Loss Report Code: Enter 10 and you will hear 3 beeps.

12. *63 Low Battery Report Code: Enter 10 and you will hear 3 beeps.

13. *64 Test Report Code: Enter 10 and you will hear 3 beeps.

14. *65 Open Report Code: Enter 110 and you will hear 3 beeps.

15. *66 Arm Away/Stay Report Code: Enter 111100 and you will hear 3 beeps.

16. *67 RF Transmitter Low Battery Report Code: Enter 10 and you will hear 3 beeps.

17. *70 Alarm Restore Report Code: Enter 1 and you will hear 3 beeps.

18. *71 Trouble Resolve Report Code: Enter 10 and you will hear 3 beeps.

19. *73 AC Restore Report Code: Enter 10 and you will hear 3 beeps.

20. *74 Low Battery Restore Report Code: Enter 10 and you will hear 3 beeps.

21. *75 RF Low Battery Restore Report Code: Enter 10 and you will hear 3 beeps.

22. *84 Auto Stay Arm: Enter 0 and you will hear 3 beeps.

23. Enter *99 to exit programming.
Once the panel programming was complete I connected to the Eyezon portal (and mobile app) and confirmed I was able to control the Honeywell alarm. The next step was figuring out how to connect the Duo to HomeKit.
Connecting the Duo to Homebridge to Expose it in HomeKit
To connect unsupported 3rd party devices to HomeKit I am using Homebridge. I installed the homebridge-envisalink-ademco plugin and then configured the plugin with the IP address of the Duo on my network, the port, the MacID password, and my alarm code (which happens to be user code #2.)
Since the plugin was now referencing the Duo device by its IP address, I wanted to ensure the address didn’t change. To achieve this, I logged into the Duo device and configured it to use a static IP address under the network options. I then assigned this static IP address to the device’s MAC ID in my router’s settings.
In the Apple Home app, I was now able to see and adjust the alarm states. However, there was still more work to be done to see and control all the devices connected to the alarm.

I wanted to have access to all the contact sensors, motion sensors, smoke alarms, and other devices in the Apple Home app. To achieve this, I needed to retrieve the corresponding zones and device names from the Honeywell panel.
Retrieving Zones from the Honeywell Panel
Using ChatGPT, I got some helpful instructions to guide me through the process. Starting with zone 01, I worked through each zone incrementing by one until no more appeared, taking photos of the zones and their names for future reference.
Step-by-Step to View Zone Names:

1. Enter Programming Mode:
* Enter your Installer Code (default is 4112), followed by 8 and 00.
Example: 4112 + 8 + 00.
* The keypad will display Installer Code 20.

2. Enter Zone Descriptor Programming:
* Press *82.
* The keypad will display "Alpha?".
* Select Yes by pressing 1 (to confirm Alpha programming).

3. View the Zone Descriptors:
* The keypad will display "Enter Zone No." prompting you to input a zone number.
* Input a zone number to view its programmed descriptor (e.g., 01 for Zone 1).
   * The keypad will show the name (if programmed) for that zone.
   * To move to the next zone, simply enter the next zone number or use the arrow keys (* to proceed and # to go back).

4. Review Additional Zones:
* Repeat the process for each zone to view its name.
   * Example: Enter 02 for Zone 2, 03 for Zone 3, etc.

5. Exit Programming Mode:
* After reviewing all zones, exit programming mode by pressing *99.
* This ensures the system returns to normal operation.
Configuring the Envisalink Ademco Plugin with Honeywell Zone Names and Adding SpeedKey Switches
I began by reviewing and updating the Homebridge Envisalink Ademco config.schema to integrate my alarm sensors into a custom configuration file. This ensures that all devices connected to my alarm system—such as contact sensors, motion sensors, door/window sensors, and smoke detectors—are visible to the plugin, appear in HomeKit, and can be included in automations.
Since my partner and I use Apple Home’s geofence settings for first-person-arrived and last-person-left automations, I wanted to automate arming and disarming the alarm based on presence. This eliminates the need to manually interact with the alarm panel every time we come and go. While Apple Home allows geofence-based triggers for sensitive devices like alarms, locks, and garage doors, it requires user confirmation when these actions are triggered. While this is a sensible security measure for most users, we prefer automatic arming and disarming with a push notification for validation.
Apple’s confirmation requirement can be bypassed by using switches, which allow direct control of sensitive devices in automations. The Homebridge Envisalink Ademco plugin supports speedkeys, which act as custom switches that send specific commands to the alarm system. Below is an example of how I configured the Zones and Speedkeys sections in the configuration file.
Zones
This section includes the alarm zones I retrieved from my panel. These zones ensure the supported sensors (e.g., door, window, smoke, motion) are detected and displayed in HomeKit.
    "zones": [
        {
            "name": "Tamper",
            "partition": "1",
            "zoneNumber": "8",
            "sensorType": "door"
        },
        {
            "name": "XX Window",
            "partition": "1",
            "zoneNumber": "13",
            "sensorType": "window"
        },
        {
            "name": "XX Heat",
            "partition": "1",
            "zoneNumber": "14",
            "sensorType": "smoke"
        },
        {
            "name": "XX Motion",
            "partition": "1",
            "zoneNumber": "15",
            "sensorType": "motion"
Speedkeys
In this section, I created custom switches (speedkeys) for each alarm state, such as Disarm and Away. These switches send raw command strings in the format <PIN><Ademco Alarm Command> directly to the EnvisaLink TPI, part of the Duo hardware. The following snippet worked without any modifications:
"speedkeys": [
    {
        "name": "Disarm",
        "speedcommand": "@pin1"
    },
    {
        "name": "Away",
        "speedcommand": "@pin2"
    }
]
Behavior in the Home App
The speedkeys will appear as switches in the Home app. By accessing the settings for these switches, you have the option to show them as separate tiles, rename them and make other adjustments. Because the switches have identical names by default, you’ll need to test each one to determine which controls arming and which controls disarming. I recommend renaming them for clarity.
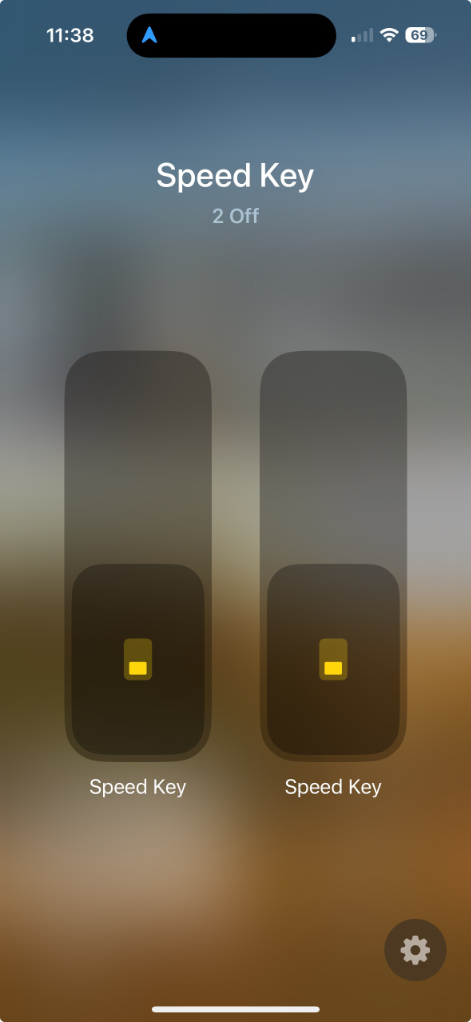
The Homebridge Envisalink Ademco plug-in continuously monitors the EnvisaLink TPI stream, ensuring the alarm state updates accurately in HomeKit. If you want to add additional alarm commands (e.g., Bypass, Max, Night, Stay, etc.), refer to the tpi.js file under exports.alarmcommand.
With these speedkeys configured, I successfully created switches that automate arming and disarming the alarm when triggered by a geofence crossing. This approach not only avoids Apple’s confirmation prompts but also provides push notifications for validation. I'll show how I use these switches in the section below on configuring geofence alarm triggers in the Home App.
Note: I’ve included # comments for clarity in the example configuration file, but you may need to remove them to save the file correctly.
{
    "name": "Envisalink-Ademco",
    "host": "192.168.XX.XX", # Enter the IP for your Duo
    "port": 4025,
    "deviceType": "20P",
    "password": "XXXXXX", # Enter last 6 digits of your Duo MacID
    "pin": "XXXX", # Enter your alarm pin
    "changePartition": false,
    "openZoneTimeout": 30,
    "heartbeatInterval": 30,
    "commandTimeOut": 10,
    "autoReconnect": true,
    "sessionWatcher": true,
    "chimeToggle": false,
    "envisalinkFailureSuppress": false,
    "ignoreFireTrouble": false,
    "ignoreSystemTrouble": false,
    "maintenanceMode": false,
    "policePanic": {
        "enabled": true,
        "name": "Police Panic"
    },
    "firePanic": {
        "enabled": true,
        "name": "Fire Panic"
    },
    "ambulancePanic": {
        "enabled": true,
        "name": "Ambulance Panic"
    },
    "partitions": [
        {
            "name": "House"
        }
    ],
    "zones": [
        {
            "name": "Tamper",
            "partition": "1",
            "zoneNumber": "8",
            "sensorType": "door"
        },
        {
            "name": "XX Door",
            "partition": "1",
            "zoneNumber": "9",
            "sensorType": "door"
        },
        {
            "name": "XX Door",
            "partition": "1",
            "zoneNumber": "10",
            "sensorType": "door"
        },
        {
            "name": "XX Door",
            "partition": "1",
            "zoneNumber": "11",
            "sensorType": "door"
        },
        {
            "name": "XX Window",
            "partition": "1",
            "zoneNumber": "12",
            "sensorType": "window"
        },
        {
            "name": "XX Window",
            "partition": "1",
            "zoneNumber": "13",
            "sensorType": "window"
        },
        {
            "name": "XX Heat",
            "partition": "1",
            "zoneNumber": "14",
            "sensorType": "smoke"
        },
        {
            "name": "XX Motion",
            "partition": "1",
            "zoneNumber": "15",
            "sensorType": "motion"
        }
    ],
    "bypass": [
        {
            "enabledbyPass": true
        }
      ],
    "speedKeys": [
        {
            "name": "Disarm",
            "speedcommand": "@pin1"
        },
        {
            "name": "Away",
            "speedcommand": "@pin2"
        }
    ],
    "_bridge": {
        "username": "XX:XX:XX:XX:XX:XX", # Auto-added just redacted mine
        "port": 50577
    },
    "platform": "Envisalink-Ademco"
}
Adding the JSON Configuration File to the Plugin
I then pasted my updated configuration file into the Homebridge Envisalink Ademco plugin settings under the JSON Config section in Homebridge and restarted Homebridge.

Creating a Child Bridge and Pairing with the Home App
After restarting, I returned to the plugin, selected Child Bridge Config, and paired it with the Home app.
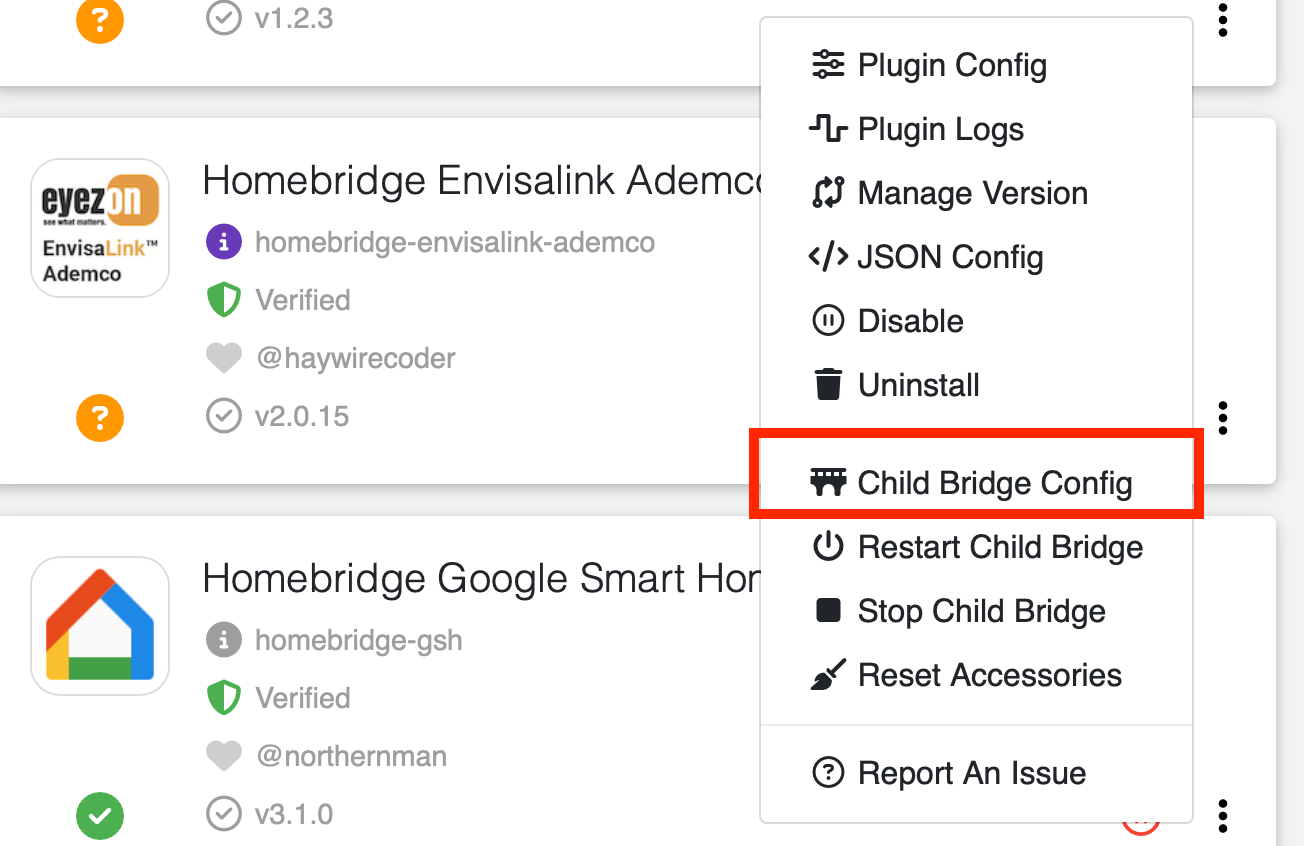
A QR code will be displayed, which you can scan with your iOS device to guide you through the pairing process.
Once the plugin is successfully paired as a bridge, a confirmation message will appear on the screen.

Adding Honeywell Zones to the Duo Portal
Performing the next series of steps simply ensures I have pretty names for all of my devices if I opt to use the Eyezon services. I logged into the Eyezon web portal and navigated to Systems > Settings.

I scrolled down to Zone Labels and selected Manage Zone Labels.

Next, I added each zone and label name from my Homebridge Envisalink Ademco configuration file to the Duo portal, ensuring I selected the appropriate partition before submitting each entry.

Viewing Alarm Sensors in the Apple Home App
With the Homebridge Envisalink Ademco plugin configured and Duo zones updated, I launched the Apple Home app. Sure enough, now all of my alarm’s contact sensors, motion sensors, and alarm sensors appeared, ready to be integrated into Apple Home automations. In my case, some alarm entities were displayed in a room as tabs above physical devices.

Configuring Geofence Alarm Triggers in the Home App
Refer to the 9/25 update at the end, which notes a few minor adjustments for setting up speed keys in v2.1.0. FWIW I self-resoled in this Github issue.
Since my partner and I use Apple Home’s geofence settings for first-person-arrived and last-person-left automations, I wanted to automate arming and disarming the alarm based on presence, removing the need to manually access the panel each time we come and go.
To enable this feature, I added the arm and disarm switches I created using speedkeys to their respective automations. It's worth noting before doing this I renamed my speedkey switches to Disarmed Home and Armed Away for better clarity.
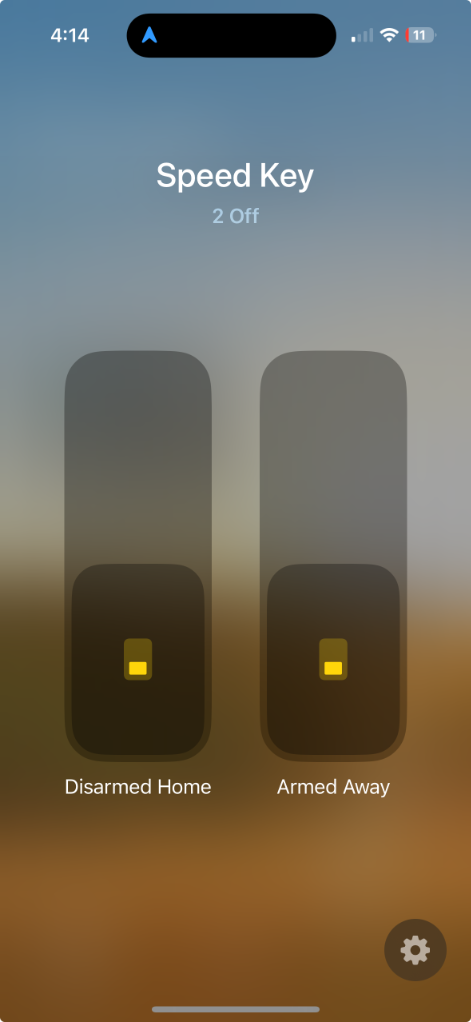
Using these switches, I configured my geofence automations to trigger the appropriate switches, allowing the alarm to automatically arm and disarm as people come and go.
Configuring an Automation to Arm the Alarm When the Last Person Leaves
In the “When the Last Person Leaves” automation, I set it to turn on “Armed Away,” which arms the alarm (e.g., sets it to Away mode).
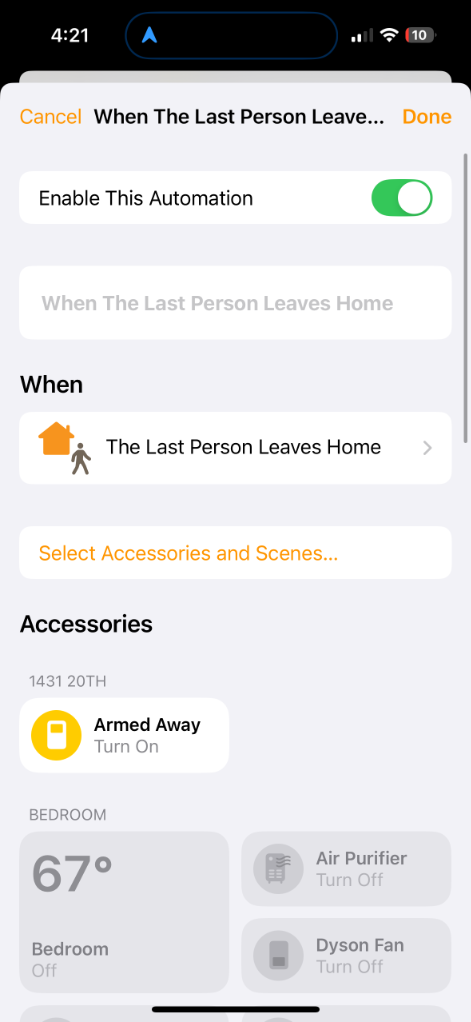
Configuring an Automation to Disarm the Alarm When the First Person Arrives
In the “When the First Person Arrives” automation, I set it to turn on “Disarmed Home,” which disarms the alarm (e.g., sets it to off).
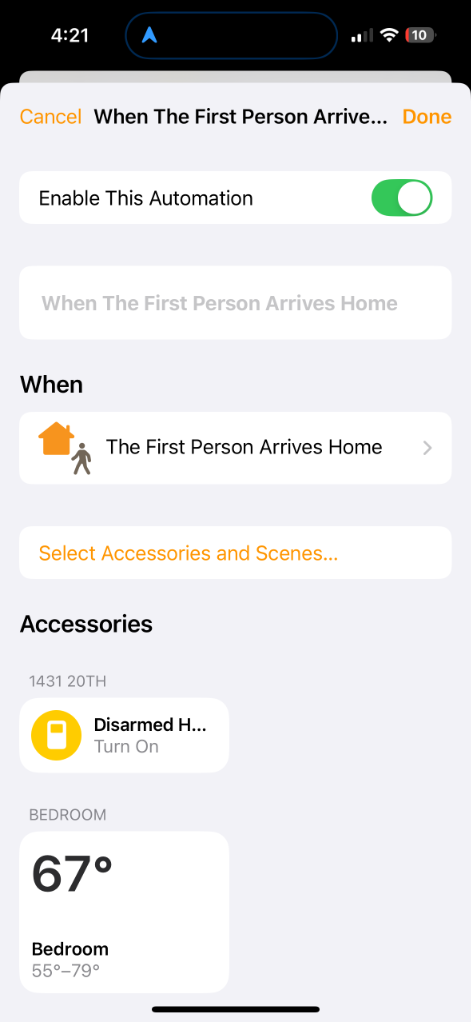
Now, when the first person arrives or the last person leaves, the alarm in the home automatically adjusts, and my partner and I receive push notifications from the Home app about the alarm state changes.

If you rely on Apple Home Activity History to track who locked/unlocked or armed/disarmed, note that geofence-triggered arm/disarm events are not attributed to any specific user.
Enabling Critical Alerts to Get Push Notifications When the Alarm Goes Off
Apple Home supports sending Critical Alerts on iOS 15 and iPadOS 15 or later. To ensure these alerts are active, verify that they are enabled under Settings > Notifications > Home.
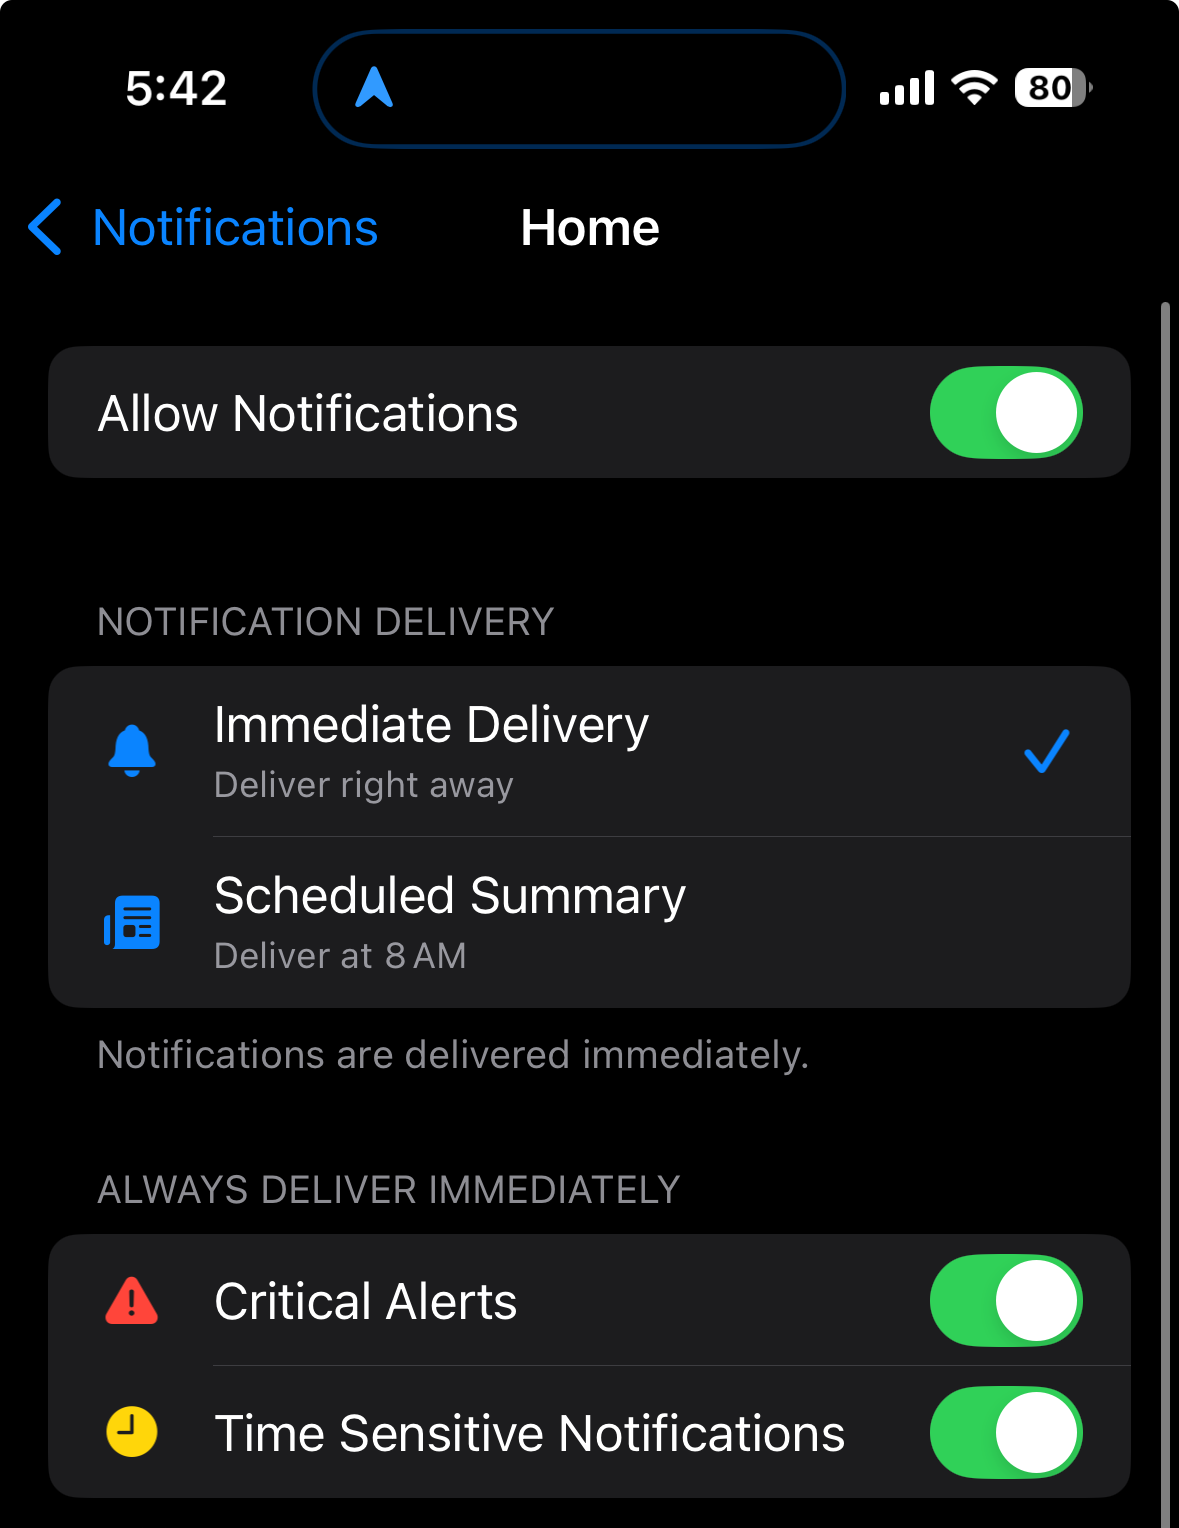
Once configured, if the security system triggers the alarm when in Away, Home, or Night (e.g., the alarm is activated), you’ll automatically receive the corresponding alert. While no additional automations are required to enable these critical alerts it's worth intentionally setting off your alarm to confirm everything is setup and working correctly.

Manually Adjusting the Alarm in the Apple Home app
It is also possible to manually adjust the alarm modes directly in the Apple Home app.

If you rely on Apple Home Activity History to monitor who armed or disarmed the system, note that manually triggered arm/disarm events are attributed to a specific user, while geofence-triggered events are not.
When Push Notifications Are Sent
Push notifications are sent in these scenarios:
- When someone else sets a mode.
- When an automation sets a mode.
- When you set a mode, but the Home app is closed or the device is locked (conditions set by Apple).
Note: Each person in the household who wants to receive push notifications from the Home app should check Settings > Notifications > Home. For instance, I made sure critical alerts were enabled on my partners phone.
Refining Alarm Notification Wording
A nice implementation detail I discovered is that by assigning the alarm and its sensors to a room named after my home address, I can receive more descriptive notifications. For example, moving the alarm to a room named “123 Main” will generate a push notification that says, “123 Main Alarm was disarmed.” Since the push notification will use the room name where the alarm is installed in the Home app it might read a bit goofy if you don’t adjust it.
Using Alarm Contact Sensors and Motion Sensors in Apple Home Automations
With the Envisalink Ademco plugin configured to expose all entities connected to the alarm, it’s possible to create automations utilizing them.
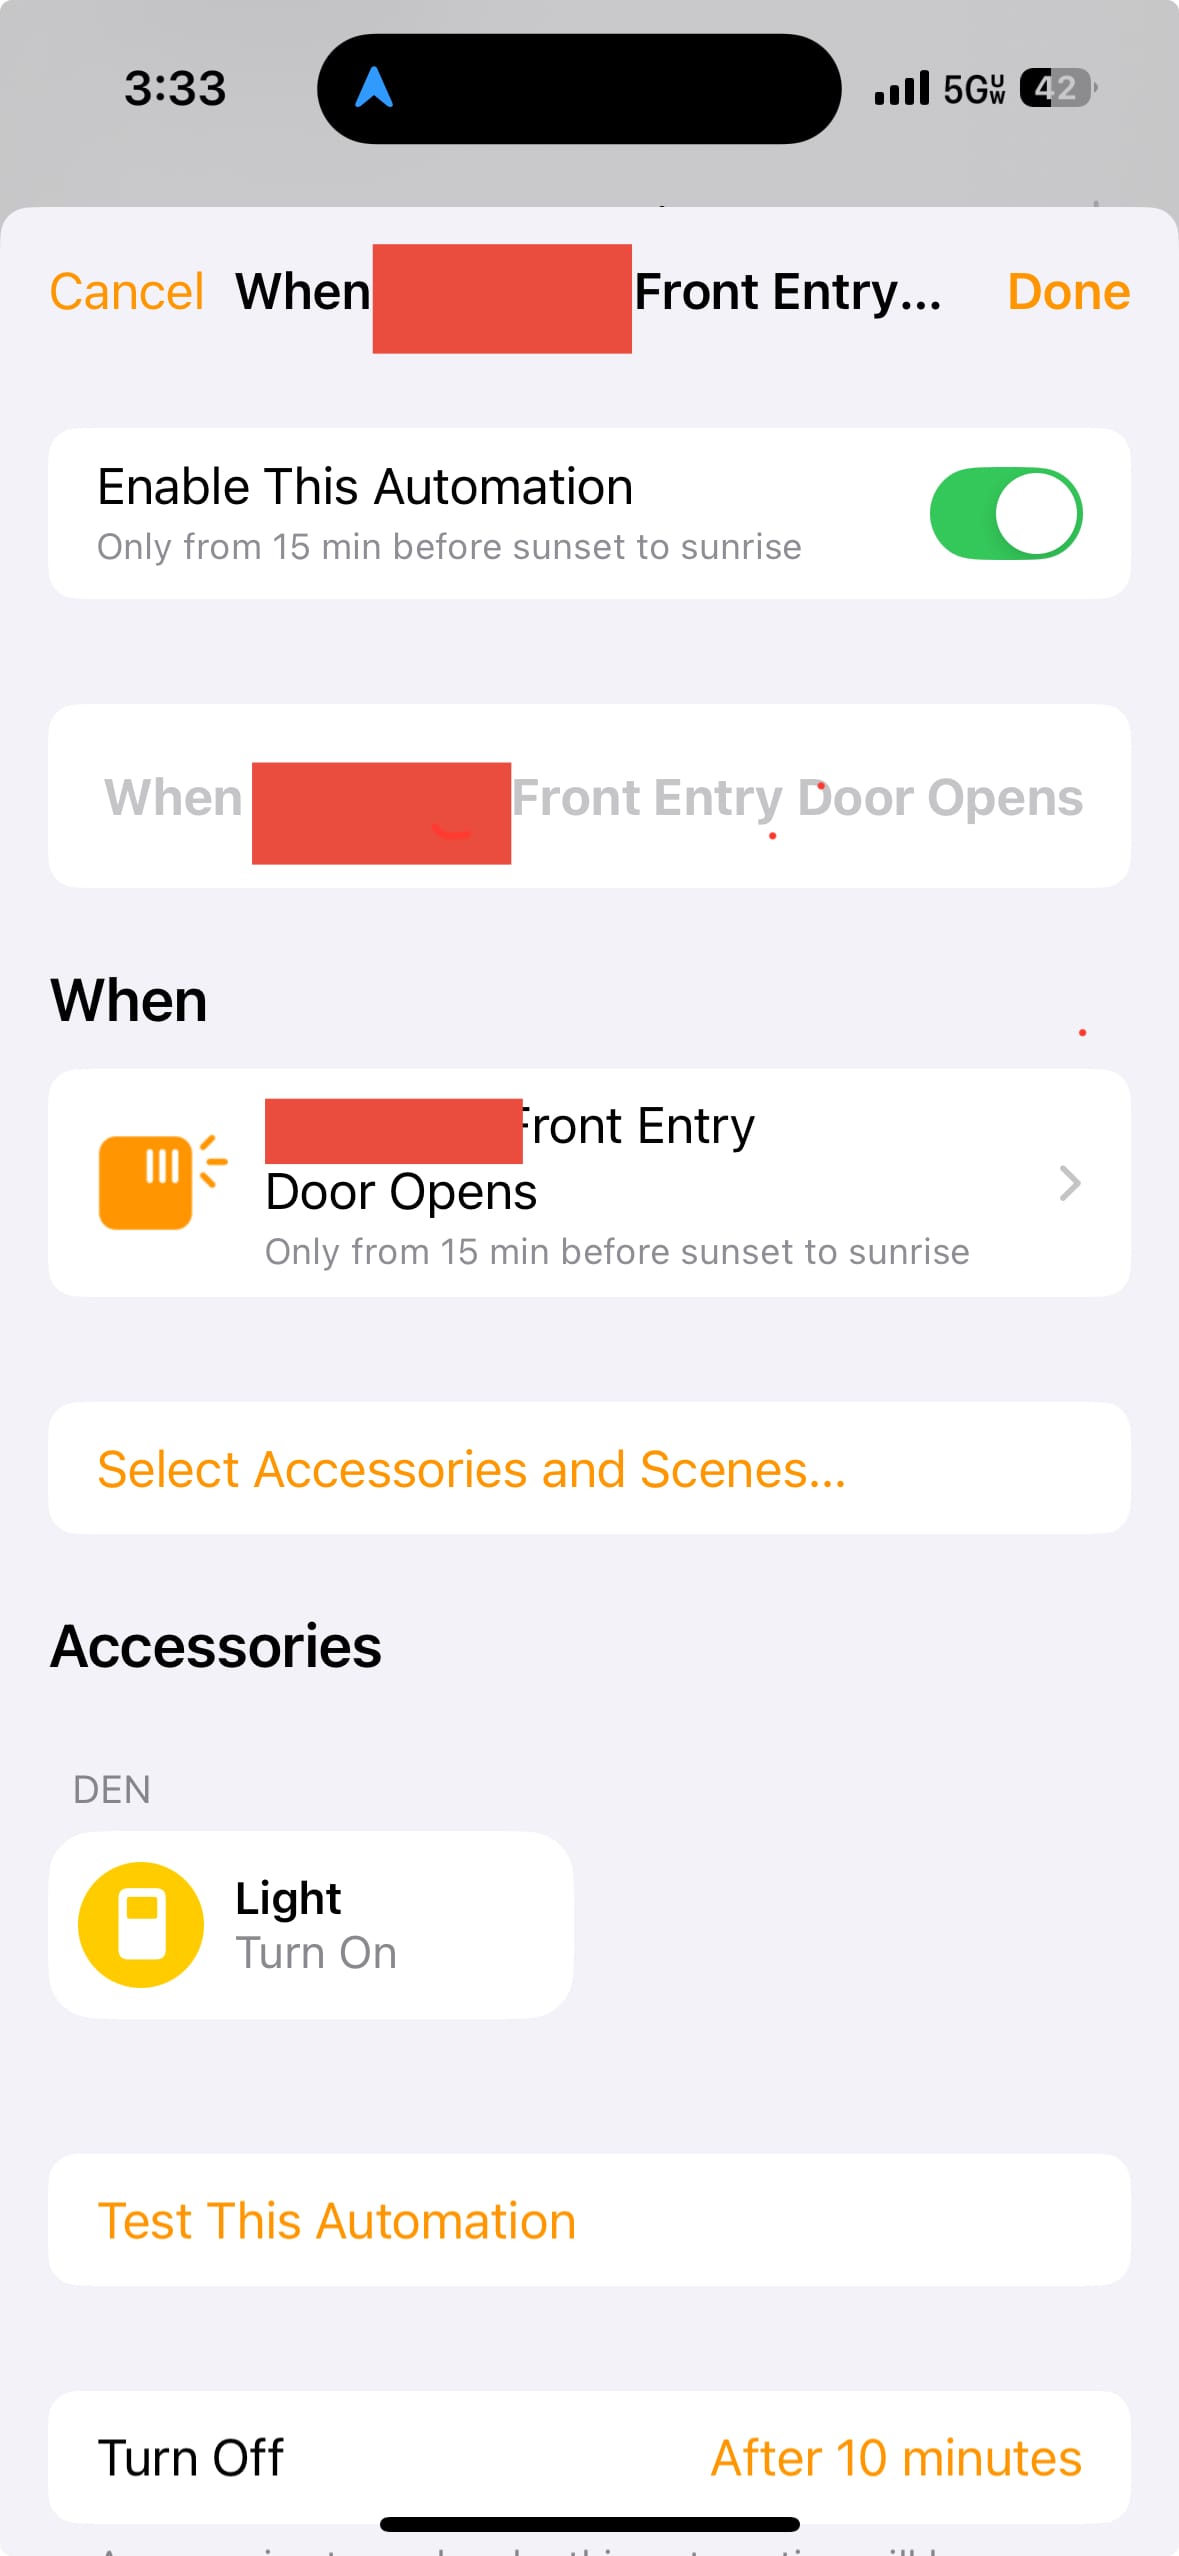
For instance, I set up an automation to turn on the Den light at night whenever the Front Door is opened, leveraging the Front Door Alarm contact sensor.
Final Thoughts
In the end, integrating my aging Honeywell alarm system into a modern smart home ecosystem was a rewarding challenge. By using Eyezon Duo, Homebridge and carefully configuring the Envisalink Ademco plugin, I was able to breathe new life into an older system while achieving seamless functionality with Apple Home. Automating my alarms with geofencing has significantly enhanced the convenience of securing my home. If you’re considering a similar upgrade, this demonstrates that even legacy systems can adapt to modern smart home needs with the right tools and effort.
A big thank you to haywirecoder for developing the Homebridge plugin for Envisalink Ademco and for taking the time to explain to me how to use speedkeys for arming and disarming. And, for updating it to work with the new Homebridge v2 plugin spec. 🙇
Update 9/25
I recently upgraded to homebridge-envisalink-ademco version 2.1.0 and found that my config required a very minor tweak (in fact, I believe it may have already been broken sometime before the update). If you are upgrading, the speed key is removed from existing first person arrives home, last person leaves home automations and needs to be manually re-added. I adjusted my Speed Key settings to look like this in the Homebridge envisalink-ademco plug-in config:

And, my JSON config now looks like this:
"speedKeys": [
    {
        "name": "Disarm",
        "speedcommand": "custom",
        "customcommand": "@pin1"
    },
    {
        "name": "Away",
        "speedcommand": "custom",
        "customcommand": "@pin2"
    }