Tailscale + AdGuard on GCP

Encrypting DNS is crucial to protect your privacy and security online. It prevents third parties from snooping on your DNS queries, ensuring that the websites you visit and the services you use aren’t easily tracked or monitored by external entities, including ISPs and others. Relying on your router or ISP to manage DNS may leave you vulnerable to unencrypted DNS queries, exposing your online activities. ISPs, in particular, can use DNS queries to collect data on your browsing habits, which are often sold to advertisers. Encrypted DNS, such as DNS over HTTPS (DoH), aims to prevent this by ensuring that your DNS requests are encrypted end-to-end, making it much harder for anyone other than the intended recipient to see your DNS queries.
I recently set up AdGuard Home on Google Cloud using a free tier VM and figured I'd document the setup process. My main objective was to ensure that my DNS is encrypted using DoH whether I am on my home network or a 3rd party network. A secondary objective was to be able to subscribe to regularly updated 3rd party filter lists that aim to block invasive trackers. While my goal wasn’t to reduce ads, but rather reduce invasive tracking, I am not complaining that I am now seeing far fewer ads when I browse the web.
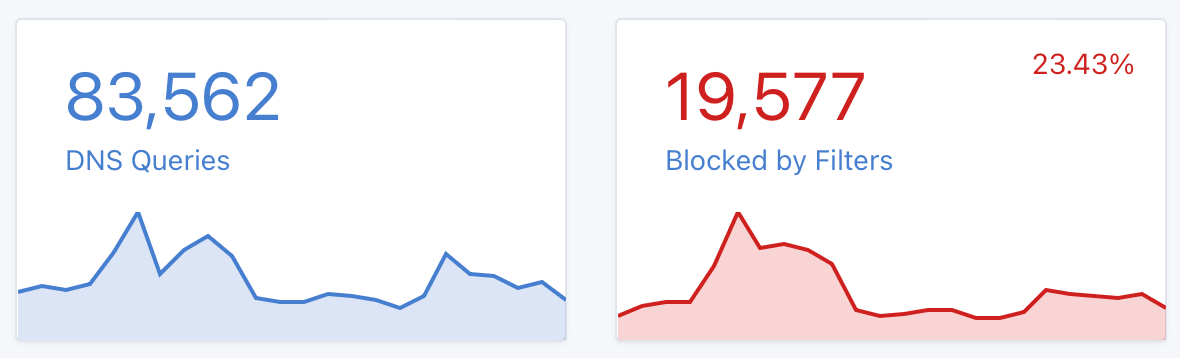
To illustrate the pervasiveness of online trackers, here's a screenshot from my AdGuard instance indicating that it has blocked 23% of traffic in the past 24 hours.
For those interested in encrypting DNS without the need to manage running AdGuard, options such as Cloudflare, Quad9, hosted AdGuard and Mullvad seem to be frequently recommended. To find out if your DNS queries are encrypted, you can investigate by utilizing the services mentioned here.
Continue reading for advice on self-hosting AdGuard Home on Google Cloud and securing the virtual machine using Tailscale.
This post documents the process I followed to install AdGuard Home on a Google Cloud Platform (GCP) instance, ensuring access is only available to devices on my Tailscale network and to the IP address of my home router.
This setup enables me to:
- Operate AdGuard at no cost on Google Cloud with a custom domain.
- Limit access to the AdGuard web administration interface to my Tailscale network.
- Control access to the virtual machine (VM) exclusively for my Tailscale network, with certain exceptions:
- Keeping TCP port 22 accessible for SSH connections.
- Opening UDP port 53, exclusively for my home IP address, allowing my router to utilize AdGuard for DNS services without needing Tailscale.
- Allow all devices connected to my Tailscale network to use AdGuard for DNS, such as when using cellular data or external WiFi networks.
1. Create a VM on GCP
I started by configuring a...
- Ubuntu 22.04 e2-micro instance server
- Enabling IP Forwarding
- Opening port 80 and port 443
- Adding my SSH key
- Setting up a (standard) static IP and attaching it to the instance
2. Install AdGuard on the VM
I SSH'd in and then followed the AdGuard automated installation script setup instructions. First, I ran these commands...
apt update
apt install curl
apt install dnsutils
Then, I ran the AdGuard installation script...
curl -s -S -L https://raw.githubusercontent.com/AdguardTeam/AdGuardHome/master/scripts/install.sh | sh -s -- -v
After installing AdGuard I found that I needed to create a new Firewall rule on GCP to allow ingress traffic on UDP port 53. While configuring this I decided to restrict this port to my home IP address. This ensures that my router is the only device that can access my AdGuard server without being on my Tailscale network.
While I won't delve into the specifics of customizing AdGuard settings, I found that adjusting the rate limit to 0 under Settings > DNS Settings > DNS server configurations significantly improved performance, effectively removing any limitations. This video has some handy tips too.
3. Register a Domain on Cloudflare
I registered a domain name to host my AdGuard instance on Cloudflare and pointed its DNS at the external IP of my VM on GCP.
While I was on Cloudflare I followed these instructions to get my Global API key. I'll need this API key to register SSL certs that will encrypt AdGuard DNS traffic.
4. Configure SSL Certificates on the VM
I installed Lego on my Ubuntu VM to facilitate creating SSL certs which will be used to encrypt the DNS traffic...
sudo apt-get -y install legoThen, I installed a script which facilitates using Lego to install and renew certificates.
mkdir /opt/lego
cd /opt/lego
curl -s "https://raw.githubusercontent.com/ameshkov/legoagh/master/lego.sh" --output lego.sh
chmod +x lego.sh
While in the directory /opt/lego I ran the lego.sh script and issued my certificates. You'll need to update your domain name, email and Cloudflare API token. Note: Lego has info on how to configure this command if you're using other DNS providers.
DOMAIN_NAME="example.org" \
    EMAIL="you@email" \
    DNS_PROVIDER="cloudflare" \
    CLOUDFLARE_DNS_API_TOKEN="yourapikey" \
    ./lego.sh
Set up a Cron Job to Renew Certificates
Since these certs expire every 90-days, and I don't want to have to remember to regularly renew them, I created a script to auto-renew them every month...
sudo vi /opt/lego/run_lego.shThen, I pasted and saved this command into the script...remember to update your domain name, email and Cloudflare API token.
#!/bin/bash
cd /opt/lego
DOMAIN_NAME="example.org" \
EMAIL="you@email" \
DNS_PROVIDER="cloudflare" \
CLOUDFLARE_DNS_API_TOKEN="yourapikey" \
./lego.sh
Finally, I made the script executable.
sudo chmod +x /opt/lego/run_lego.shSince I need this to run using sudo I created this crontab.
sudo crontab -eThen, I pasted and saved this command to run the script on the 16th of every month at 10:30 AM.
30 10 16 * * /opt/lego/run_lego.sh5. Install Tailscale Clients on Personal Devices
I want to restrict access to the AdGuard admin panel strictly to my Tailscale network, and at the same time, ensure that I can use AdGuard's DNS services while I'm not at home. To accomplish this, I have installed Tailscale on my personal devices and signed in.
6. Prepare the VM on GCP for Tailscale
I followed these instructions to configure my Ubuntu VM to run Tailscale. The following deviations describe changes I made as part of step 3 and step 4.
Deviation to Advertising Routes
From the GCP console I got my VMs Network interfaces subnet mask and updated the advertise routes IP address. The main deviation was that I had to run this as sudo and I had to use my ssh_key_username for the operator command.
sudo tailscale up --accept-dns=false --advertise-routes=10.X.X.X/20 --accept-routes --operator=ssh_key_usernameDeviation to Adding a Tailscale Nameserver
I got a little tripped up and had to deviate again from the instructions. Here's what ended up working for me on the Tailscale DNS Admin site.
- For Nameserver, enter the external IP address for the AdGuard server running on GCP.
- Ensure Restrict to search domain is checked.
- For Search Domain, enter internal.
Deviation to Adding a Tailscale Global Nameserver
I configured my Tailscale Global Nameservers to use the VMs Tailscale IP address. You can get the IP address either by visiting the Tailscale Machines site or SSHing into the machine and running tailscale ip -4.
7. Install Tailscale on the VM
I installed Tailscale on the Ubuntu instance following these instructions.
Configure the VM as a Subnet Router and Exit Node
I configured the VM to be used as a Tailscale subnet router following these instructions.
Updating Tailscale
I configured auto-updates to get the latest version of the Tailscale client.
tailscale set --auto-update8. Secure the VM with UFW
To limit server access to devices on my Tailscale network, I set up Ubuntu with the Uncomplicated Firewall (UFW) by following these instructions. This setup enables me to restrict the AdGuard admin interface to devices connected to my Tailscale network, while also enabling active Tailscale clients to use AdGuard for DNS. I made slight adjustments to my GCP firewall rules to allow for SSH and DNS port openings.
Open SSH to non-Tailscale Traffic
This server will exclusively host AdGuard and Tailscale. I intend to restrict its accessibility to traffic not coming from Tailscale. Nevertheless, to avoid losing SSH access in case of any issues with my Tailscale connection, I've decided to leave port 22 open (and I decided to add another Firewall rule to restrict access to my home IP) by implementing the following UFW rule...
sudo ufw allow 22/tcp
sudo ufw status
Open DNS to non-Tailscale Traffic
Earlier, I established a firewall rule on GCP to limit access to UDP port 53 exclusively to my home IP address. With the server now restricted to only Tailscale traffic, it's necessary to open this port to enable my home router to utilize AdGuard DNS without the need for Tailscale, accomplished by implementing the following UFW rule...
sudo ufw allow 53/udp
sudo ufw status
9. Update VM Hosts File
To get my VM to respond to my custom domain name using the Tailscale IP I needed to modify my /etc/hosts file by SSHing into the machine and running...
sudo vi /etc/hostsThen, I added two lines and saved the file. The first line contains the VMs Tailscale IP address and my custom domain name. The second line just references the name of the VM in the GCP console.
100.X.X.X example.org
127.0.1.1 name_of_VM
10. Update Cloudflare Domain to Tailscale IP
Since I want to restrict access to the AdGuard admin site exclusively to devices on my Tailscale network, I modified the DNS record for the domain hosted on Cloudflare. Rather than pointing to the external IP address of the VM, I adjusted the domain record to direct to the VM's Tailscale IP address.
11. Configure Home Router to use AdGuard
Finally, I configured my home router to use the external IP address of my AdGuard server VM as the primary DNS. For redundancy, I set 1.1.1.1 as the secondary DNS to ensure continued internet access in the event the AdGuard server is unreachable.
12. Optional: Add Custom DNS to Apple Devices
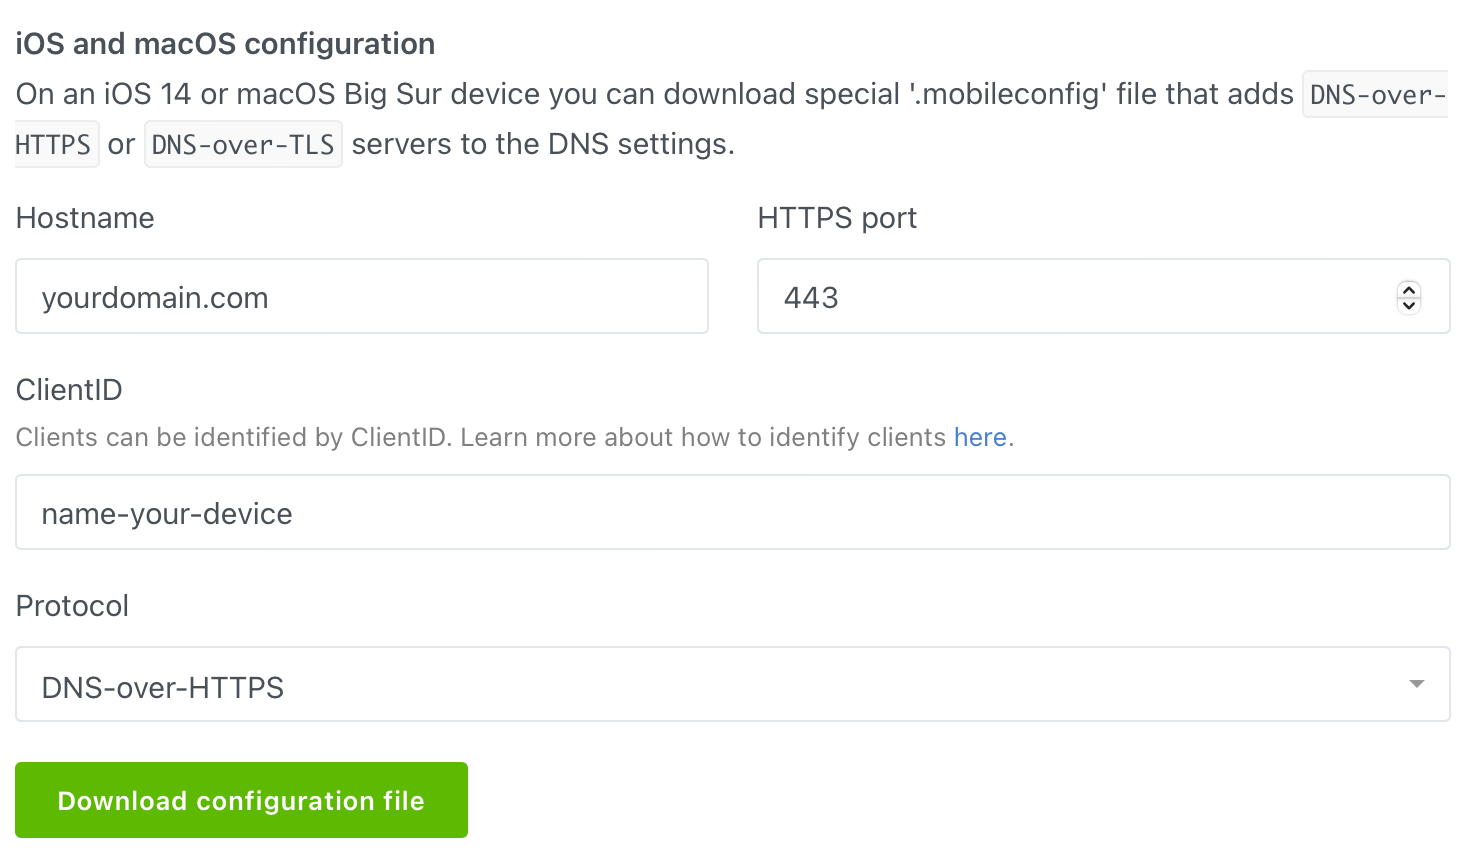
Setup Flow for iOS, iPadOS, and macOS
On devices running iOS 14 or later, or macOS Big Sur or later, you can download a special .mobileconfig file that adds DNS-over-HTTPS or DNS-over-TLS servers to the DNS settings. This setup uses profiles to identify specific devices, allowing you to apply unique settings to each one.
For example, my devices are all monitored, given unique names, and have specific filtering rules applied, while my partner's devices are not uniquely identified and have no filtering rules. Since I have profiles installed on my devices, I can use my AdGuard custom DNS even when I'm outside the house, whereas my partner's devices cannot. If I disable Tailscale outside of my home network, my devices simply revert to using the ISP's DNS servers.
Finding the option to create a mobile config can be a bit tricky. In the AdGuard Home admin interface, navigate to the Setup Guide in the navigation bar. Scroll down and tap on DNS Privacy, then continue scrolling to the section for iOS and macOS configuration.
Once you reach this screen, update your hostname, create a unique ClientID for each device you want to uniquely identify, and select the protocol you're using. Finally, download and install the configuration file on the respective device.
13. Optional: Maintenance Scripts
Updating VM Software
I don't want to be logging in regularly to the VM to manage server software so I added a weekly script to update server packages and software. Since I need this to run using sudo I updated my crontab.
sudo crontab -eThen, I pasted and saved this command to run the script on Saturdays at 10:30 AM. I figure if there are issues it's best they happen on a weekend when I usually have time to deal with such things.
30 10 * * 6 /usr/bin/apt update && /usr/bin/apt -y upgradeUpdating AdGuard Daily
I added a daily cron to check if AdGuard needs updating (and apply any changes.)
30 11 * * * /opt/AdGuardHome/AdGuardHome --update >> /var/log/adguard_update.log 2>&1Rotating Logs
I configured logrotate to remove my AdGuard Home update log by creating a configuration file in /etc/logrotate.d/
sudo vi /etc/logrotate.d/adguard_updateThen, I configured the file with the below configuration...
/var/log/adguard_update.log {
daily
rotate 7
compress
delaycompress
missingok
notifempty
create 640 root adm
}
This will...
- Rotate the log
daily. - Keep 7 old log files.
- Compress log files, starting with the second most recent.
- Not throw errors if the log file is missing.
- Not rotate the log file if it's empty.
- Create new log files with specified permissions, owner, and group.
Machine Image
Although I haven't set up regular backup schedules for my virtual machine, I've created a machine image to facilitate easy restoration to a known state without needing to reconfigure everything. I plan to update this image periodically, especially after significant configuration changes.
14. Optional: VM Optimizations
E2-Micro instances are resource constrained and can easily have issues. I have found from experience that it’s helpful to disable things that can cause problems.
In the GCP VM console, within Security and access, under Shielded VM I disabled features which I've found to cause micro instances to lock-up:
- Secure Boot
- vTPM
- Integrity Monitoring
I also SSHd into the VM and disabled snapd (since I am not using it anywhere and I've found it to cause issues from requiring too much memory.)
sudo systemctl stop snapd
sudo systemctl disable snapd
15. Optional: Restart VM with CloudBeatMonitor
Occasionally, the server can hang, requiring a manual reboot. I created a project that does not require access to the Tailscale network and can reboot the VM if it appears unresponsive after 2 minutes. You can read more about CloudBeat Monitor and grab it on Github.
16. Optional: Address rsyslog errors
Adjust ACL for syslog
I observed ongoing problems with my virtual machine restarting unexpectedly. Upon inspecting my logs, I discovered entries related to rsyslog errors, specifically mentioning "action 'action-13-builtin:omfile' resumed" and "action 'action-13-builtin:omfile' suspended" prior to the reboots.
I believe altering the ACLs for the syslog group may have been part of addressing this issue. First, I installed ACL on the VM.
sudo apt-get update && sudo apt-get install aclThen, I added sudo permissions for the syslog group to /dev/console so it could read and write:
sudo setfacl -m g:syslog:rw /dev/consoleI started monitoring my logs:
journalctl -u rsyslog -eNote: If you try this and want to revert the permission change the following command removes only the ACL entries specifically added for the syslog group, without affecting any other ACL entries that might exist on /dev/console. Use this option if you've added specific permissions for the syslog group and want to revert just those changes while leaving any other ACL settings untouched.
sudo setfacl -x g:syslog /dev/consoleUpdate rsyslog.conf
I also followed some advice I found online and edited the rsyslog configuration file /etc/rsyslog.conf:
sudo nano /etc/rsyslog.confThen, I found these lines:
$FileOwner syslog
$FileGroup adm
$FileCreateMode 0640
$DirCreateMode 0755
$Umask 0022
$PrivDropToUser syslog
$PrivDropToGroup syslog
And, commented them out and saved the file:
#$FileOwner syslog
#$FileGroup adm
#$FileCreateMode 0640
#$DirCreateMode 0755
#$Umask 0022
#$PrivDropToUser syslog
#$PrivDropToGroup syslog
Afterwards, I restarted the rsyslog service:
sudo systemctl restart rsyslogEvery so often I'll SSH into the VM to check how long it's been online to ensure it's not rebooting frequently:
last reboot -F | head -1Summary
This was quite a setup process, but the outcome is that my entire home network, along with any devices on my Tailscale network, now utilizes my AdGuard server for DNS. This means that by installing the Tailscale client on my mobile phone and configuring the VPN, my phone will also use my AdGuard server for DNS when connected to cellular networks or 3rd party WiFi networks. This approach not only safeguards my DNS queries but also drastically reduces the number of ads I come across. Additionally, by configuring a Tailscale client as an exit node on my home network, I am now able to access resources within my home network when I'm remotely connected to Tailscale.